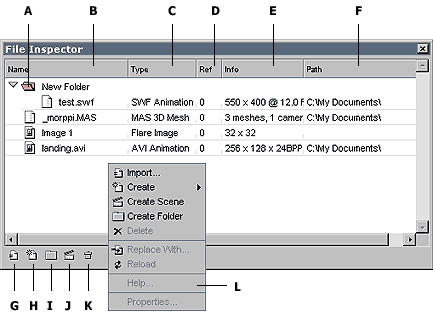
The File inspector displays the files imported to the demo. In the File Inspector you can see the name of the file, the type of the file, the number of references made from this file, some information describing the content of the file and the original path of the file. All the files you import are embedded in the demo file.

A. Folders lets you organize your files.
B. Name of the file.
C. Type of the file.
D. Reference count of the file. This also includes references made from other files.
E. Info about the file. This is a short description of the content of the file.
F. Full Path of the file.
G. Import button lets you import files to a selected (or root) folder.
H. Create button lets you create new files.
I. Folder button lets you create new folders.
J. Scene button lets you create new scenes.
K. Delete button lets you delete selected files.
L. Popup menu for importing a file, creating a new file, creating a new scene, creating a folder, deleting, replacing and reloading a file, and for editing file properties. Press the right mouse button to show the menu.
The File inspector lets you manage the files in the demo. You can import new files, create new files, create new scenes, delete unused ones, reload or replace existing files and add files to the layers or effects in the demo. Since many import plugins may use the same file extension, if the plugin is not specified in the file selector dialog, it will be asked shortly after. The program lists all the available plugins for that extension.
With file inspector you can organize your files into folders. A new folder can be created from the button at the bottom of the File Inspector window or using the popup menu. You can choose the file name and the color of the folder. Files can be arranged into different filders by dragging the file just like you would drag the file into Timeline.
To open the file inspector window:
- Choose View > File Inspector (Ctrl + I)
To import new file to demo:
- Press the right mouse button in the File inspector window and choose Import from the popup menu.
- Choose the file you want to import and press OK.
or
- Choose File > Import...
- Choose the file you want to import and press OK.
- Press the Import button at the bottom of the File Inspactor
- Choose the file you want to import and press OK.
To create a new file to demo:
- Press the right mouse button in the File inspector window and choose Create from the popup menu, and the file type you want to create.
- Change file properties if necessary and press OK.
or
- Press the Create button at the bottom of the File Inspactor, and choose the file type you want to create.
- Change file properties if necessary and press OK.